04 August 2014

The Eleventh Hour: A Curious Mystery Birthday Celebration

Sugababe 2 loves puzzle mystery books. And The Eleventh Hour by Graeme Base is by far her most well-loved one.  

In the story, Horace the Elephant throws an elaborate fancy-dress celebration for his 11th birthday, which is attended by ten animal guests as colourful and flamboyant as their host (including an Egyptian princess Cat and Punk Zebra among others).  When the guests and host return from 11 rounds of party games, they discover that the sumptuous banquet that Horace prepared is gone - every single cake, pastry and gastronomic delight - stolen. In the end, they have to make do with sandwiches and the birthday cake (which was thankfully not taken, since it was left in the kitchen). They never did find the culprit who stole the birthday feast, and the reader is invited to solve the mystery based on clues that are strewn all over the gorgeously-illustrated pages. 

As expected, whenever an unusual theme is adopted (especially one that hasn't been done before), some thought is required as to how it can be translated to a birthday cake in a meaningful way. I considered and rejected several ideas, including making the cake a clock face showing the 11th hour (too much emphasis on "11" when we were celebrating her 7th birthday), making fondant versions of the animals in the story (no way to  do this well given how beautifully detailed the characters are in the book), and making a copy of the birthday cake (a white tiered cake which looked too much like a wedding cake).

In the end, I decided to reproduce one of the cakes that Horace prepared as part of his birthday feast: the Chocolate Supreme. The cake consisted of two stacked rounds of a icy, dark, chocolate buttermilk cake (my easy, perfect go-to chocolate cake for birthdays), with drippy icing flowing down its sides and a traditional basket-weave design on its top.  The biggest challenge in making this cake was having to do 3 different types of frosting - chocolate frosting for the baseket-weave top and sides, a white swiss meringue one for piping swirls on top of the cake, and a drippy white one that had to flow down both layers.  

In the story, the Chocolate Supreme was one of the items that was stolen from the banquet feast, and I felt that it was appropriate to give a hint as to how that happened by making fondant versions of the cuprit(s), placed strategically around the cake.

The end result, while not looking exactly like its illustrated version in the book, came close enough. If there were any imperfections in its appearance, I happily excused them on the basis of this line in the book:

"And though it may be said perhaps, that Horace made a mess, 
The Feast that he created was Fantastic, nothing less."

And indeed that was the verdict delivered by the birthday girl, who declared that it was delicious. I must say that the combination of moist dark chocolate cake with vanilla and white chocolate frosting makes for a very pleasing, old-school combination.   


Despite the challenges of thinking up and making the birthday cake, The Eleventh Hour was the perfect theme for a birthday celebration.  My husband ingeniously came up with eleven clues (in rhyming verse, no less, just like in the book!) that our birthday girl had to solve in order to find her present. This, our puzzle-solver extraordinaire tackled with great enthusiasm together with her older sister. 


All in all, a perfect birthday cake and theme for my Sugababe 2 - a unique, creative and out-of-the box thinker who constantly keeps us on our toes.  Many times it feels like our precious little girl is a puzzle to us too, one that didn't come with the answers.  We wouldn't have wanted it any other way though.  Accompanying the challenges of deciphering her are the rewards of knowing her in all her beautifully layered and "fearfully and wonderfully made" detail.


Besides, I could never resist a good puzzle.

02 May 2014

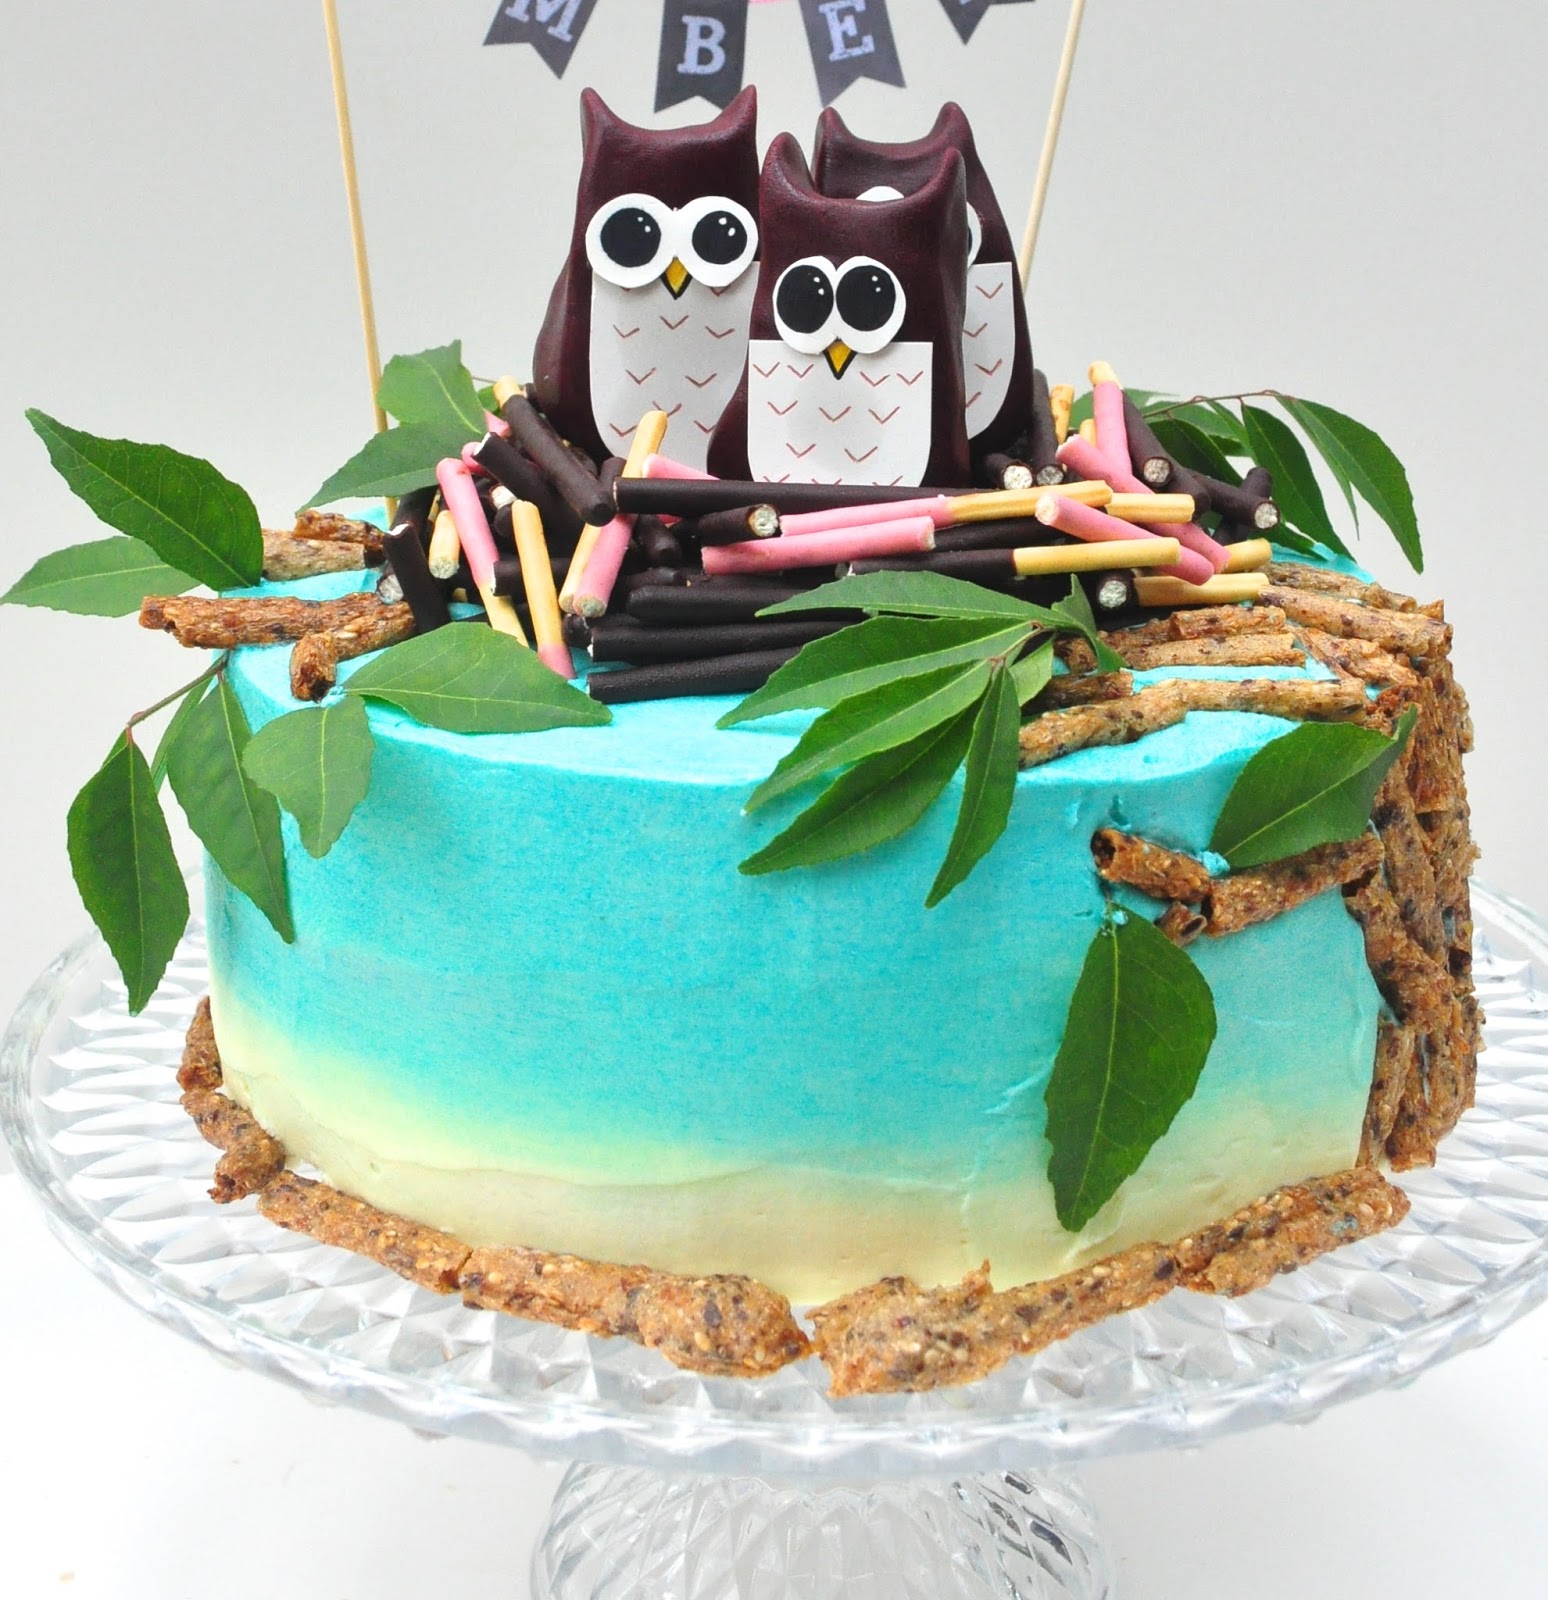
Owl Babies Birthday Cake

I had a hard time deciding which book to use as a theme for Sugababe3's 3rd birthday. She has many "favourite" books, and some of them are hard to translate to cake.  


There was of course also the inevitable request for a Frozen cake, which I promptly denied as it was too common, and really, we've heard and seen enough of Frozen in our household of 3 little girls by now. A Frozen cake would a little too hard to stomach. 

We finally settled on Martin Waddell's "Owl Babies". Have you read the story before? It's about 3 owlets - Sarah, Percy and Bill - who wake up one night in their hole in the tree, to find that their mother is gone. As they wait for their mother to return they grow increasingly anxious. The older two try to think about what their mother could be doing and when she would return. But the youngest baby owl is so sad that he just keeps saying "I want my Mummy" throughout the book. 

It was such an apt choice of book for Sugababe3's birthday cake. For one, we have 3 girls in the house and she is the youngest (not to mention that she is also turning 3). She is also SUCH a Mummy's girl, constantly asking for me and saying "I want my Mummy". 

For me it is so important when making a birthday cake, to be able to somehow identify and connect with the theme. It gives me the enthusiasm and passion to see through the many steps of making, designing and assembling the birthday cake.


Normally, chocolate is my default choice for a birthday cake, simply because it is such a crowd-pleaser. However, Sugababe3 is not a fan of chocolate (I know, it's crazy right?). 

She asked for an orange cake (she adores oranges), and while I would normally prefer to make a chiffon cake (as I prefer it's light texture) I decided that the cake might need to be a little more dense and sturdy to hold up the owl babies and their nest. 

In the end I tried Sweetapolita's Orange Party Cake.  It had a really interesting mixing technique I hadn't seen before for cake batter - that of mixing softened butter into the dry ingredients until the resulting texture resembled coarse breadcrumbs. (The only instance I know of a breadcrumb-like texture being needed when baking is when making pie crust).

The cake base is quite average - fragrant, and in terms of its texture it resembled a yellow cake and is sturdy enough for a party cake but not particularly moist or tender.  I found it necessary to moisten each cake layer with Orange Cointreau syrup. The orange whipped cream filling however is delicious, although I regret I cannot say the same for the buttercream frosting which was unbearably sweet. I regretted not going with a lighter swiss meringue frosting as we ended up scraping off most of the buttercream when we were eating the cake.  

Decorating the cake, as always, was the fun part. I was very blessed to have a lot of help from the husband this time. We used Pocky sticks for the owl nest, and these awesome organic crackers from iHerb* for the tree trunk. The pretzel sticks are so wonderfully gnarled and textured that they really look like branches!  The most challenging part was probably making the fondant owls, a task made more challenging by our discovery the night before her birthday that I had mistakenly bought a packet of RED (instead of white) rolled fondant. The original plan was to make grey owls (like the owls in the book) but given that it was too late to go out and buy white fondant (or to make a batch), we made do and turned the owls dark brown instead. Of course that meant that we had NO white fondant with which to add other details to the owls (eyes, beak etc), so the hubs drew these on cardboard and we simply affixed them onto the fondant owls. In the end I think the owls turned out cuter than if we had cut out its features with fondant. 

It's no secret that I am not a fan of fondant, and when I can find an alternative way to decorate the cake other than by using fondant I am sure to use it. And so, when deciding what to use for the leaves on the tree, I chose some edible leaves from my garden instead of fondant leaves (which I assume would be the natural choice for many). It might amuse you to know that I used curry leaves. Fortunately it did not alter the taste of the cake in any way and functioned merely as food-grade decoration. 

The last touch was a chalkboard bunting made with the free printable from Yellow Bliss Road.

Was Owl Baby pleased with the result? You can bet she was. 


Owl Babies by Martin Waddell. Click here to buy!


* iHerb: Use code DZB944 to get $10 off your first order! 


15 August 2013

"The Lord of the Rushie River" Birthday Cupcakes


One of my favourite childhood memories is of lazy holiday afternoons spent lying in bed, listening to the stories from Marshall Cavendish's StoryTeller series from the 80s. One of these was "The Lord of the Rushie River" by Mary Cicely Barker (creator of the"Flower Fairies").  Denise Bryer's sensitive narration of this poignant story truly draws out the beauty of this tale of the friendship between a lonely little girl and a river swan.  It is hard to put in words, the mixture of these feelings of sweet nostalgia and deep joy in being able to share these stories with my children, and the delight of reliving my own childhood wonder as I see them being enjoyed by mine as they used to by me. Over these stories of imaginary lands and people and tales of far-away countrysides and places, I feel I have forged a closer bond with my children, if that is even possible. 
How precious -  this legacy of beloved childhood tales being passed from one generation to the next. And reflecting on this, it seemed only natural to draw on our shared love for this touching English tale, as inspiration for Sugababe 1's 8th birthday. 

As far as themed birthday cakes go, this was fairly easy to pull off as we already had a swan-themed cupcake tree, cupcake liners and toppers. (A real relief, as I have no idea how one would go about making fondant swans). Fragrant orange baby cakes iced with an orange drizzle frosting were baked in English Rose patterned liners, and topped with a variety of edible flowers to evoke the wild English countryside. And to complete the look - a beautiful illustration of Susan and her dear swan displayed in an old Pottery Barn frame bought during my honeymoon. 

The best part of our display, however, would have to be the second-hand, 1976 edition of The Lord of the Rushie River - a surprise gift for her that I had scoured the net too long for, and ordered too late, but which still managed to arrive the day before just in time for her birthday celebration.  Its pristine pages (not a single yellow spot!) and impeccably timed delivery left me in no doubt that this was God's present to her too. 

There was magic this afternoon, watching my 8 year old's wide-eyed wonder as she took in the flower-strewn cupcakes ("Are these really edible Mummy?") and hearing her happy exclamation when she saw the framed illustration. She flitted admiringly from one side of the display to another in her sequinned dress, and I found myself wondering for the umpteenth time this week, how is it possible that she had grown so fast? I still remember her first day, her birth day (she lights up with joy whenever I retell this), the day I became a mother for a first time, how in love I was, how overjoyed. How I did not sleep for the entire first night despite the exhaustion of childbirth, because I could not believe that this, this beautiful baby, was mine. And now she is 8? I blink, still myself to capture her in this moment ... in the soft morning sunlight ... but like glints of light on a rushing river these moments flow through the fingers of my mind.  

Happy birthday, my 8 year old, and don't you grow up too fast. 


Recipe for Orange Cakes with Orange Drizzle Icing


For these regular sized cupcakes, I used a double recipe portion of Mini Paris Cupcakes from Epicurious, with 1 tablespoon of grated orange zest added after butter and sugar are creamed to fluffy consistency. Cupcakes are moist and tender, but care has to be taken to perform the creaming step properly for it to be at its best. For the orange drizzle icing, start with 175g of icing sugar mixed with 4 tsp of orange juice, add more icing sugar or juice as necessary for the icing to reach the desired consistency. The icing should be thick and spreadable or slowly pourable but not so runny that it would overflow the cupcakes.  


11 May 2013

Charlotte's Web Birthday Cake

Sugababe 2 was turning 6, and we were discussing what theme her birthday cake was going to have. As usual, I had my unspoken ideas about what kind of cake I wanted to make, and tried (I thought, cunningly) to steer the direction of the discussion in my favour. Basically, it was simple. I saw a picture a friend had posted on Facebook of piggies in a chocolate mud bath and wanted to do the same. The chocolate mud and kit kat bathtub slats kind of had me at hello.

But my daughter had other ideas. First, she wanted a Fibonacci birthday cake (thanks, but no thanks, Vi Hart).  Apart from the fact that that kind of cake crosses dangerously from geek to nerd territory, 6 is not a Fibonacci number, really. Next, she suggested a Flower Fairies cake (no way was I going to be able to make those figures ...).  Followed by a couple of other really impractical ideas. And then I slyly showed her the piggies ...

Me: OOOOHHHH look at those piggies they are SOOOOO cute!!!
Sugababe 2: Nope.
Me: C'mon, you're born in the year of the pig!
Sugababe 2: Nope!!!
Me: And I can, um, change it to like a CHARLOTTE'S WEB cake!! You like Charlotte's Web right??
Sugababe 2: But Wilbur was not in a chocolate bathtub!!!
Me: It's ok, I'll just add a spider! (More pestering on my part ensues ...."
Sugababe 2: (grudgingly) OKAAAY ....

I must admit I was kind of elated at having won her over to MY way. I could do the cake I liked and just plaster a spider web somewhere. Until ...

Husband: Have you read Charlotte's Web?  Wilbur wasn't in a mud bathtub!
Me: Noo ... I haven't but but but ... I am SURE he was kind of like in the mud??
Husband: I'm just saying it's strange.
Me: (Whine) Are you saying it's not going to look nice???
Husband: You know, I'm just saying it's a cute cake but it's not a Charlotte's Web cake. And how ARE you going to suspend the spider web? On the side of the wooden bath? Isn't that going to look odd?

He got me of course. Over the next couple of days I conceded that I had to do a proper true-to-the-story Charlotte's Web cake. It really didn't help that, not only did Sugababe 2 want a spider web, she wanted it to say "Some Pig", like in the story.

I had some rough idea of how I was going to construct the farm - green coconut grass, a biscuit barn house, fondant carrots in a cocoa-powder garden patch, pretzel sticks for the wooden fencing, and a fondant Wilbur.

But the spider web really had me stumped. What could I use to make a spider web that could suspend from the barn house? I tried making a fondant spider web which literally fell apart once I held it up. Piped white chocolate would be too thick and might also not hold up well.

It was past midnight before the day of the party, the cake was all done up, all except the dreaded spider web. We went through options like tying a thread spider web, cutting a paper web, etc. Until it hit me that we could just draw in the spider web with a white marker on a transparent sheet to give the illusion of a hanging spider web.

So voila! With that, I completed one of my most challenging cakes to date. The result was a 4 layered dark chocolate cake (made with the perfect birthday cake recipe, which my husband was most pleased to see me return to after my brief affair with another chocolate cake recipe), with alternating chocolate ganache and strawberry cream filling, painstakingly decorated with sufficient details and accuracy such as to leave no room for doubt that this was supposed to be a Charlotte's Web cake and not just a piggy cake. And just in case anyone needed some help in coming to that conclusion, I also constructed a huge banner with the words "Charlotte's Web".

A Herculean baking effort for a little girl's birthday. But then again, she is not just any girl, but SOME GIRL, to be sure.

Happy birthday my very special 6 year old.


28 April 2013

Lollipops & Ruffles

My Sugahbabe 3 turns 2!  She specifically requested for a yellow cake (as in a yellow-coloured cake - not a butter cake) with lollipops on top.

Frankly I was not too inspired by the little one's requests. I mean, YELLOW? And Lollies? For one, yellow is not a great colour for
cakes. Or clothes, or furniture. Or basically anything else for that matter. In my books at least. And then, lollipops?  How cliched could you get for a kids' cake? Being the good mother that I was, I showed her lots of pictures of OTHER cakes which I though were more interesting, to cunningly steer her into choices that would perhaps be more exciting and challenging for me to execute. But nope, she would have none of it.  Yellow it had to be. With swirly lollipops (she pointed to the picture on the iPad browser to make sure I got her point).  The only change she made was to specify that it also had to have many other colours, like "green" and "pink", but it had to be a YELLOW cake. Great, now I had to do a gaudy, multi-coloured cake? Then again, what was a Mamma to do but deliver?


Once I got over the initial disappointment of having to work with a colour I wasn't crazy about and a cake theme that was not really a theme, I started to plan. Along the way I found a way to make it interesting for myself by exploring how I could turn her birthday cake into a ruffle-ly one. In the end, I settled for these pretty and unique ruffles piped from buttercream (no fondant please!). Sugahbabe actually has a baby swimsuit that has ruffles just like these and in the same colours too.  

The birthday cake base is taken from a recipe from Rose Levy Beranbaum for a chocolate layer cake.
Four layers of chocolate cake interspersed with strawberry buttercream (inspired by Sweetapolita - such an awesome blog!) with outer layers frosted and piped with plain vanilla buttercream.   My decision to use a RLB recipe for the chocolate cake was a departure from my usual preference for a chocolate buttermilk cake base.  I have to say that the chocolate buttermilk cake is a superior cake in every way - in terms of flavour, crumb and moistness.  I found RLB's cake too crumbly and not sufficiently moist and springy.  On the other hand, what it has going for it is a good fudgey flavour and (what made me try it in the first place) the fact that it really is very easy to make. For those who are inclined to try RLB's recipe, I would just say that ensuring that the cake is thawed completely before serving makes a world of difference.  If it is just the slightest bit cold, it tends to be very brittle, dry and crumbly. At room temperature the texture improves dramatically and if you don't mind buttercream that is a bit runny, microwaving it just a little bit improves it even more.

Finally, lollipops were fashioned out of fondant, as that would ensure I could colour them to match the buttercream. The little one got her wish after all! Yellow cake with lollies. But kids are hard to please. 2 days later, she is now asking me to make another BIG cake.  I have to find a way to make her 2 year old mind understand this is a once in a year affair.

25 February 2013

Caramel Drenched Date & Rum Cake


Haven't found much time to bake these days what with a very active toddler and my decision to homeschool my middle child this year. The hubs has been looking longingly at this brown beauty on my Donna Hay magazine for the longest time so I decided to surprise him one day. It's a phenomenal cake. The combination of Medjool dates, raisins, prunes and a generous pouring of rum results in a soft and moist cake with rich rum and toffee notes. Since the ingredients (Medjool dates, rum, brown sugar, etc) are all known for their subtle caramel or toffee flavours, eating this cake is like tasting 4 different variations of toffee in one bite. The salted caramel sauce just takes it over the top. 

Within a few hours after my greedy family polished off this cake, my eldest daughter was asking for me to make another. While I do love Rachel Allen's Sticky Date Pudding with black tea ... this recipe might just have sent it into permanent retirement! 


Recipe for Rum and Date Cake with Caramel Sauce
(Donna Hay issue #62)

1 1/2 cups (210 grams) dates, chopped
1/2 cup (90 grams) prunes, chopped

1/2 cup (75 grams) raisins
3/4 cup (180 ml) boiling water
1/2 cup (125 ml) rum
1 1/2 teaspoons baking soda, sifted
1 1/2 cups (225 grams) self-rising flour**, sifted
1 1/3 cups (235 grams) brown sugar
225 grams butter, melted
1 1/2 teaspoons vanilla extract
6 eggs
Caramel sauce:
100 grams butter
3/4 cup (135 grams) brown sugar
1/2 cup (175 grams) golden syrup***
1 cup (250 ml) single cream
1/4 cup (60 ml) rum
- Place the dates, prunes, raisins, boiling water, rum, and baking soda in the bowl of a food processor and leave for about 10 minutes. Process the mixture until smooth. Set aside.
- Place the flour and sugar in a bowl and mix to combine. To this add the butter, vanilla, eggs, and the date/rum mixture. Mix well to combine.
- Pour the batter into a well greased bundt pan (3.5 liter capacity) and bake in a pre-heated 160C (325F) oven for 55-60 minutes or until cooked when tested with a skewer. Allow to cool in the tin for about 10 minutes then turn out onto a wire rack to cool completely.
- While your cake is baking you can make the caramel sauce. Place the butter, sugar, syrup, cream, and rum in a saucepan over medium heat and stir until the sugar is dissolved. Bring to a boil and cook for 10-12 minutes, or until thickened.
- Allow both the cake and sauce to cool completely before pouring the sauce over the cake. 

18 May 2012

A Tale of 1 Busy Afternoon, 2 Tubs of Yogurt and 3 Cakes

And the story goes somewhat like this:

ONE afternoon (a crazy, busy afternoon I might add) I discovered, to my dismay, that we had mistakenly kept TWO tubs of yogurt, not just any yogurt mind you, but the very best kind, into the freezer. As anyone who has ever committed this regrettable error can tell you, freezing yogurt has the unfortunate effect of transforming its luscious creamy texture into a grainy, watery, separated mess that looks rather like the curdled regurgitations of a baby.

TWO whole tubs of beautiful Puhoi Valley yogurt gone to waste. Most people, happily possessed of saner dispositions than mine (plenty are it would seem) would perhaps calmly dispose of the spoilt yogurt and make a mental note to buy some on their next grocery trip. And then having let the matter go they would devote their time to the more pressing matters of their day (especially if they were having, like me, a very busy afternoon). Unfortunately, I am not one of those people, as you may have guessed by now. And not only that, but I am also precisely the kind of person who would cry over spilt milk, or mouldy cheese, or, in this case, ruined yogurt. And in my great desire to stop myself from further wringing of hands and blubbering over said yogurt, I decided that I had NO CHOICE but to redeem the damned yogurt. By baking not one, nor two, but THREE yogurt cakes, since that was mathematically the only way I could use up all of it. Don't you just love the inescapable logic of Maths.

And the moral of the story? Waste not, want not? Or perhaps this ... when life gives you ruined yogurt, curdled milk, or leftover sour cream that you simply can't see go to waste ... make yogurt cakes? Because, yes, yogurt cakes can be made with all the above. But more importantly, because making yogurt cakes is easy. Ridiculously EASY. Your kids could do it. And you know I am not lying to you because there is no way I could have made 3 in one afternoon if this was not the case. I am a little unstable perhaps but not THAT crazy.

Each recipe requires really only 2 bowls, one for wet ingredients and the other for dry, which you then mix together and bake and voila! Cake! No need to bring out the mixer. No creaming or beating or whisking.

I followed two recipes. The first is a basic yogurt cake recipe by Chocolate & Zucchini, which though plain, is so light and fluffy it's good enough to eat on its own. There are many ways to vary this basic recipe: To make an Orange Yogurt Cake, I added a tablespoon of orange zest. And for the Strawberry Yogurt Cake, I used strawberry yogurt and also pieces of strawberry fruit. The latter baked up a little denser because of the extra liquid from the fruit and strawberry purée in the yogurt, but it was otherwise still very moist and delicious (and was the kids' favourite). I have found that the recipe is rather forgiving of minor errors, so if you are pressed for time and a little slipshod with your measurements, you will still end up with a pretty decent cake. For the Lime & Almond Cake, I adopted a recipe from Dorie Greenspan instead, swopping the lemon out with lime. The addition of almond flour gave it a pleasant nutty aroma, and although this recipe seemed to yield a heavier cake than the other, I loved its richer flavor. If I had the time I would make a rosewater glaze for this cake, I think it would go beautifully.

We ate our way through 3 cakes that week without any complaint from the kiddos. They were good enough that I almost found myself wondering when I'd have the good fortune to have a yogurt accident again. Well, now that you've heard my story, perhaps you will have one. On purpose. Lucky, lucky you.


Gâteau au Yaourt
from Chocolate & Zucchini [http://chocolateandzucchini.com]

Ingredients
2 eggs
250ml (1 cup) whole milk plain unsweetened yogurt (if you use two 125ml or 4oz tubs, you can use them to measure out the rest of the ingredients)
200g (1 cup) sugar (you can use an empty tub of yogurt and measure the equivalent of 2 yogurt tubs if you used the 125ml or 4oz kind)
80ml (1/3 cup) vegetable oil (or a bit less than 1 yogurt tub)
2 cups all-purpose flour (or 4 yogurt tubs)
1 1/2 teaspoon baking powder
1/2 teaspoon baking soda
a good pinch of salt
1 teaspoon pure vanilla paste/extract
1 tablespoon light rum

Method: Preheat the oven to 180° C (350° F), line the bottom of a round 25-cm (10-inch) cake pan with parchment paper and grease the sides. In a large mixing-bowl, gently combine the yogurt, eggs, sugar, vanilla, oil, and rum. In another bowl, sift together the flour, baking powder, baking soda, and salt. Add the flour mixture into the yogurt mixture, and blend together -- don't overwork the dough. Pour the batter into the prepared cake pan, and bake for 30 to 35 minutes, until the top is golden brown and a cake tester comes out clean. Let stand for ten minutes, and transfer onto a rack to cool.


French Yogurt Cake 
Adapted from "Baking From My Home to Yours" by Dorie Greenspan (Houghton-Mifflin, 2006)


Yield 8 servings
Time About 1 hour and 20 minutes


Ingredients
  • 1 cup all-purpose flour
  • 1/2 cup ground almonds (or, if you’d prefer, omit the almonds and use another 1/2 cup all-purpose flour)
  • 2 teaspoons baking powder
  • Pinch of salt
  • 1 cup sugar
  • Grated zest of 1 lemon (or 2 limes)
  • 1/2 cup plain yogurt
  • 3 large eggs
  • 1/4 teaspoon pure vanilla extract
  • 1/2 cup flavorless oil, such as canola or safflower
Method
  • Getting ready: Center a rack in the oven and preheat the oven to 350 degrees. Generously butter an 8 1/2-x-4 1/2-inch loaf pan, place the pan on a lined baking sheet and set aside. Whisk together the flour, ground almonds, if you’re using them, baking powder and salt and keep near by as well.
  • Put the sugar and zest in a medium bowl and, working with your fingertips, rub the zest into the sugar until the sugar is moist and aromatic. Add the yogurt, eggs and vanilla to the bowl and whisk vigorously until the mixture is very well blended. Still whisking, stir in the dry ingredients, then switch to a large rubber spatula and fold in the oil. You’ll have a thick, smooth batter with a slight sheen. Scrape the batter into the pan and smooth the top.
  • Slide the baking sheet into the oven and bake 35 to 40 minutes for the round cake or 50 to 55 minutes, or until the cake begins to come away from the sides of the pan; it will be golden brown and a knife inserted into the center of the cake will come out clean. Transfer the pan to a rack, cool for 5 minutes, then run a blunt knife between the cake and the sides of the pan. Unmold and cool to room temperature right-side up.
  • Serving: In France, this cake is usually served with a little sweetened crème fraiche, but it lends itself to other toppings as well. Fresh soft fruit, like sliced peaches or plums, is a natural with this as is berries with a touch of sugar. And, because the cake is plain and just a little tangy from the yogurt, it pairs happily with lemon cream, curd or mousse and is delicious with chocolate mousse or chocolate sauce.
  • Storing: Wrapped well, you can keep the cake at room temperature for at least 4 days and, like many pound cakes, it will be better one day later than it was the day it was made. If you do not glaze the cake, you can wrap it airtight and freeze it for up to 2 months; glazed it’s best not to freeze the cake.

01 February 2012

World Peace Cookies

It all started when Sugababe 2 read her Richard Scarry book. There was a picture of some small cute animal (I forget which one, the book's full of them) munching on a plate of chocolate cookies. Somehow the moral lesson of the story was eclipsed by that tantalising illustration of tiny chocolate chip cookies, because after that, she kept begging me to make her some. I know how it feels to have a craving, and more so, how important it is to satisfy one, especially when chocolate is involved. So, busy as I was, I immediately set about to make her the best chocolate cookies in the world. Of course, the fact that by that time I was experiencing the onset of the same craving may also explain why I went straight to the kitchen instead of saying "Shoo!".

Thankfully, I DO know the recipe for the best chocolate cookies ever. Seriously. You don't have to look elsewhere. Nothing beats this for an intense hit of chocolate. It's ridiculously good for very little effort. Just use really good dark chocolate, like Valrhona or Callebaut, and enjoy with a tall glass of cold milk. And because I love that salted chocolate thing going on there, I sometimes sprinkle some extra flaked Maldon sea salt on top before popping it into my mouth. Heaven. Bless Richard Scarry and his cute animals.

Recipe for World Peace Cookies

Excerpted from Baking: From My Home to Yours by Dorie Greenspan (Houghton Mifflin, 2006).

"I once said I thought these cookies, the brainchild of the Parisian pastry chef Pierre Hermé, were as important a culinary breakthrough as Toll House cookies, and I've never thought better of the statement. These butter-rich, sandy-textured slice-and-bake cookies are members of the sablé family. But, unlike classic sablés, they are midnight dark — there's cocoa in the dough — and packed with chunks of hand-chopped bittersweet chocolate. Perhaps most memorably, they're salty. Not just a little salty, but remarkably and sensationally salty. It's the salt — Pierre uses fleur de sel, a moist, off-white sea salt — that surprises, delights and makes the chocolate flavors in the cookies seem preternaturally profound.
When I included these in Paris Sweets, they were called Korova Cookies and they instantly won fans, among them my neighbor Richard Gold, who gave them their new name. Richard is convinced that a daily dose of Pierre's cookies is all that is needed to ensure planetary peace and happiness."

Ingredients

175 grams all-purpose flour

30 grams unsweetened cocoa powder

1/2 teaspoon baking soda

150 grams unsalted butter

180 grams light brown sugar

50 grams sugar

1/2 teaspoon fleur de sel or 1/4 teaspoon fine sea salt

1 teaspoon pure vanilla extract

150 grams bittersweet chocolate

Instructions

1. Sift the flour, cocoa and baking soda together.

2. Working with a stand mixer, preferably fitted with a paddle attachment, or with a hand mixer in a large bowl, beat the butter on medium speed until soft and creamy. Add both sugars, the salt and vanilla extract and beat for 2 minutes more.

3. Turn off the mixer. Pour in the dry ingredients, drape a kitchen towel over the stand mixer to protect yourself and your kitchen from flying flour and pulse the mixer at low speed about 5 times, a second or two each time. Take a peek — if there is still a lot of flour on the surface of the dough, pulse a couple of times more; if not, remove the towel. Continuing at low speed, mix for about 30 seconds more, just until the flour disappears into the dough — for the best texture, work the dough as little as possible once the flour is added, and don't be concerned if the dough looks a little crumbly. Toss in the chocolate pieces and mix only to incorporate.

4. Turn the dough out onto a work surface, gather it together and divide it in half. Working with one half at a time, shape the dough into logs that are 1 1/2 inches in diameter. Wrap the logs in plastic wrap and refrigerate them for at least 3 hours. (The dough can be refrigerated for up to 3 days or frozen for up to 2 months. If you've frozen the dough, you needn't defrost it before baking — just slice the logs into cookies and bake the cookies 1 minute longer.)

5. Center a rack in the oven and preheat the oven to 160C. Line two baking sheets with parchment or silicone mats.

6. Using a sharp thin knife, slice the logs into rounds that are 1/2 inch thick. (The rounds are likely to crack as you're cutting them — don't be concerned, just squeeze the bits back onto each cookie.) Arrange the rounds on the baking sheets, leaving about 1 inch between them.

7. Bake the cookies one sheet at a time for 12 minutes — they won't look done, nor will they be firm, but that's just the way they should be. Transfer the baking sheet to a cooling rack and let the cookies rest until they are only just warm, at which point you can serve them or let them reach room temperature.

30 September 2011

Chocolate Tweed Angel Cake - Fit for a Princess

My little girl is growing up. For her 6th birthday, instead of asking me to make a 3D cake, or a pink 'princessy' cake, Sugababe 1 graciously told me that she was fine with anything I chose.  This, coming from a girl who has always been a 'girly-girl', insisting on pink, or princess themes, when faced with a choice on anything.

"Anything you like, Mummy" she said.
It wasn't just about the cake.  This year there was no list of demands, and she was even happy not to have a birthday party but to just spend a day out with us.

It's a change that has been happening for some time, this realisation that she doesn't always need to insist on her way, but that she can give way to others, and make room for other ideas of what is good, or what is beautiful.  That it's okay if she doesn't have the only available pink cup or crayon (is it only in my household that girls would fight over this?).  That she doesn't always need to be in a dress, but that jeans and a T-shirt are fine too. That it is okay for her sister to have, wear or enjoy something that is 'nicer' than hers, because she is not any less special for not having the same thing.

Such are the rewards of a parent when you see glimpses of your child maturing into gracious and beautiful inner attitudes and behaviour.
I have always delighted in meeting my kids' birthday cake demands, no matter how much work it took to bake and build those 3D confections.
But this time, given free reign to bake for her what I chose, I had joy of a different kind.
I decided on this Chocolate Tweed Angel Cake, because she loves the soft texture of angel cakes, and also anything with chocolate.  But mainly, I loved that this was such a beautiful cake, its chocolate-speckles against white bringing to mind the elegance of Chanel tweed, and a princess of a different kind.  Yes, not a make-believe fairy tale princess with pink frou-frou and ribbons and bows. But a REAL princess - sophisticated, gentle and gracious.
Happy Birthday!

Recipe for Chocolate Tweed Angel Food Cake
by Rose Levy Beranbaum
Serves 14 to 16.
1-1/2 cups, divided superfine sugar
3/4 cup cake flour, lightly spooned and leveled off (or 1 cup, sifted into the cup and leveled off)
1/4 teaspoon salt
16 large egg whites, at room temperature, or 2 cups
2 teaspoons cream of tartar
4 teaspoons pure vanilla extract
fine-quality unsweetened or 99% cacao chocolate, chilled, finely grated, refrigerated
SPECIAL EQUIPMENT: One ungreased 10-inch (16 cups) two-piece metal tube pan or 1 long-necked glass wine or soda bottle, or a large inverted metal funnel that will fit into the opening at the top of the pan. (Have this ready before baking and weight it by filling it with sugar or marbles to keep it from tipping.)
PREHEAT THE OVEN: Twenty minutes or more before baking, set an oven rack in the lower third of the oven and preheat the oven to 350°F/175°C.
PREPARE THE SUGAR, FLOUR, AND SALT: In a small bowl, whisk together half the sugar, the flour, and salt until evenly combined. Sift the remaining sugar onto a piece of wax paper.
BEAT THE EGG WHITES INTO A STIFF MERINGUE: In the bowl of a stand mixer fitted with the whisk beater, beat the egg whites on medium speed until foamy. With the mixer off, add the cream of tartar. Raise the speed to medium-high and beat until soft peaks form when the beater is raised. Gradually beat in the sifted sugar and continue beating on medium-high speed until very stiff peaks form when the beater is raised slowly. Beat in the vanilla until combined.
MAKE THE BATTER: Dust (lightly sprinkle) the flour mixture over the beaten whites, 1/4 cup at a time (if using cake flour, sift it over the whites). With a large balloon whisk, slotted skimmer, or large silicone spatula, fold in the flour mixture quickly but gently. It is not necessary to incorporate every speck until the last addition. Fold in the grated chocolate until evenly incorporated. Using a long narrow spatula or silicone spatula, spread a thin layer of batter onto the sides of the prepared pan to ensure smooth sides. Empty the rest of the batter into the pan. In a 16-cup pan, it will be 1/2-inch from the top of the rim. Run a small metal spatula or knife through the batter to prevent air pockets and smooth the surface evenly.
BAKE THE CAKE: Bake for 30 to 40 minutes, or until golden brown, a wire cake tester inserted between the tube and the side comes out clean, and the cake springs back when lightly pressed in the center. (A wooden toothpick will still have a few moist crumbs clinging to it.) During baking, the center will rise about 2 inches above the pan, but it will sink to almost level with the pan when done. The surface will have deep cracks, like a souffle.
COOL AND UNMOLD THE CAKE: Invert the pan immediately, placing the tube opening over the neck of the bottle to suspend it well above the countertop. Cool completely in the pan, about 1-1/2 hours.
Loosen the sides of the pan with a long narrow spatula and remove the center core of the pan. Dislodge the cake from the bottom and center core with a metal spatula or thin sharp knife. (A wire cake tester or wooden skewer works well around the core. To keep the sides attractive, press the spatula firmly against the sides of the pan, moving the spatula up and down as you go around it.) Invert the cake onto a flat plate covered with plastic wrap that has been coated lightly with nonstick cooking spray and reinvert it onto a serving plate. Allow the cake to sit for 1 hour, or until the top is no longer tacky. Then cover it with a cake dome or wrap it airtight. It keeps for 3 days at room temperature and for 10 days refrigerated. Freezing toughens the texture. The cake is also lovely decorated simply with a light sprinkling of cocoa or lacy drizzles of melted chocolate. Do not serve this cake with sauce as it would fall apart.

12 July 2011

Lime Yogurt Cake with Rosewater and Pistachios


*******************************************************
I remember when I first saw Rachel Allen demonstrate this very exotic, Persian-inspired cake with rose and pistachios on Rachel Allen: Bake. I thought it was just one of the prettiest flavour-combinations ever.  It put me in mind of beautiful Middle Eastern desserts like baklava and romantic holiday escapades to Arabia ala Sex and the City and Disney's Aladdin.

I am glad that when I finally had a chance to make and taste this cake, it did not disappoint. 

Refreshing with zesty lime, and fragrant with the floral scent of rosewater, it also has a very light and tender crumb.  Ground almonds give this cake a pleasant nuttiness and a delicate 'fall-apart' texture. A welcome departure from the usual rich, buttery cakes that I am so fond of (this one has no butter at all).  It is a subtle cake which is neither overpowering nor assertive.  Beautifully ambrosial, with a flavour that improves over time.  In a tea spread, it won't jostle for attention among richer cakes of chocolate, cream and butter.  But, like a true Middle Eastern veiled beauty, its unique, alluring flavour will grow on you and have your guests returning for more.

Recipe for Lime Yogurt Cake with Rosewater and Pistachios
(slightly adapted from a recipe by Rachel Allen)

Ingredients

For the cake
225 g self-raising flour
1 tsp baking powder
1 pinch salt
75 g ground almonds
100 g caster sugar
2 eggs
1 generous tbsp or 50g runny honey
250 ml natural yogurt
150 ml sunflower oil

1 lime, finely grated zest only

For the syrup
150 ml water
100 g caster sugar
1 lime, juice only

1-2 tsp rose water (I used Nielssen Massey)

For decorating 

50 g unsalted pistachio nuts, roughly chopped
rose petals, (optional)

Method: 
1. Preheat the oven to 180C/gas 4. Line the base and sides of a 22cm spring-form/loose-bottomed cake tin with greaseproof paper.

2. Sift the flour, baking powder and salt into a large bowl. Stir in the ground almonds and caster sugar.

3. Mix together the eggs, honey, yogurt, sunflower oil and lime zest together well in a medium-sized bowl until smooth. Make a well in the centre of the dry ingredients and slowly pour in the wet ingredients, bringing them together with a whisk until they are just combined. You can add some chopped pistachios to the mixture if you wish, or save them for decorating.

4. Pour the mixture into the prepared tin and bake in the oven for 50 minutes or until a skewer inserted into the middle comes out clean. Leave to cool in the tin for about 20 minutes.

5. While the cake is cooling, make the syrup. In a small saucepan, boil the water and sugar for about 5 minutes until it is reduced by half. Add the lime juice and boil for a further 2 minutes, then cool. Add rosewater to taste (about 1 teaspoon, see note below).

6. With a fine skewer, make holes on top of the warm cake and spoon the syrup all over the top. Scatter the pistachios over, if you wish, and leave to settle for 1 hour.

7. Decorate with rose petals, if using. Serve with cream, natural yogurt, sliced mangos or berries. It is a very moist cake so keeps extremely well in the fridge for a few days. 


Note: 
1) Rosewater can be overpowering if used excessively, so use sparingly. I used 1 teaspoon for the syrup.  The original recipe calls for 1-2tbsp but that is excessive in my opinion. 


2) Although this cake can be refrigerated, it is best served at room temperature. Part of its beauty is that it has a very delicate, tender and crumbly texture.  However, this will not come through if the cake is cold and not thawed properly. I kept mine at room temperature for 3 days in an airtight container and found that it improved in taste and texture over time. 

3) This cake looks best when baked into little rose or flower shaped mini cakes. I used a Nordic Ware bouquet pan.  A Nordic Ware rose muffin pan, like the one I used for my Salted Caramel Banana Cakes,  is also an excellent choice.  

07 July 2011

Blueberry Yogurt Brûlée


*****************************************************
Here in our household, we've all been trying to eat more yogurt these days, ever since a recent Harvard study concluded that yogurt was the best food for long-term weight loss. Apparently, the study found that not all calories are created equal. So one could theoretically eat the same number of calories of yogurt as another might eat in, say, french fries, and the former would lose weight while the latter gained weight.

Interesting, you may say. Tragic, if you ask me.

Since the same study also found potatoes to be the worst food for keeping off weight gain.  Hard to swallow as that may be, I can't pretend that the finding was really a surprise. Deep in my gut I always suspected my faulty logic of replacing lunch or dinner with a giant bag of chips wasn't good weight-loss practice (although I frequently pretended it did).  So guilty was I about my unhealthy potato habit (and also for all the times I've used chips to bribe the kids) that I immediately declared our home a potato-free zone for a year. Yes, that means no chips, french fries, mash or hash for 365 days. I think this might be the hardest dietary choice I have ever made in my life. If it makes no difference to our health or weight in a year, you can be assured I will resume my chip habit.

At the same time, I also decided we could all try to consume more yogurt.

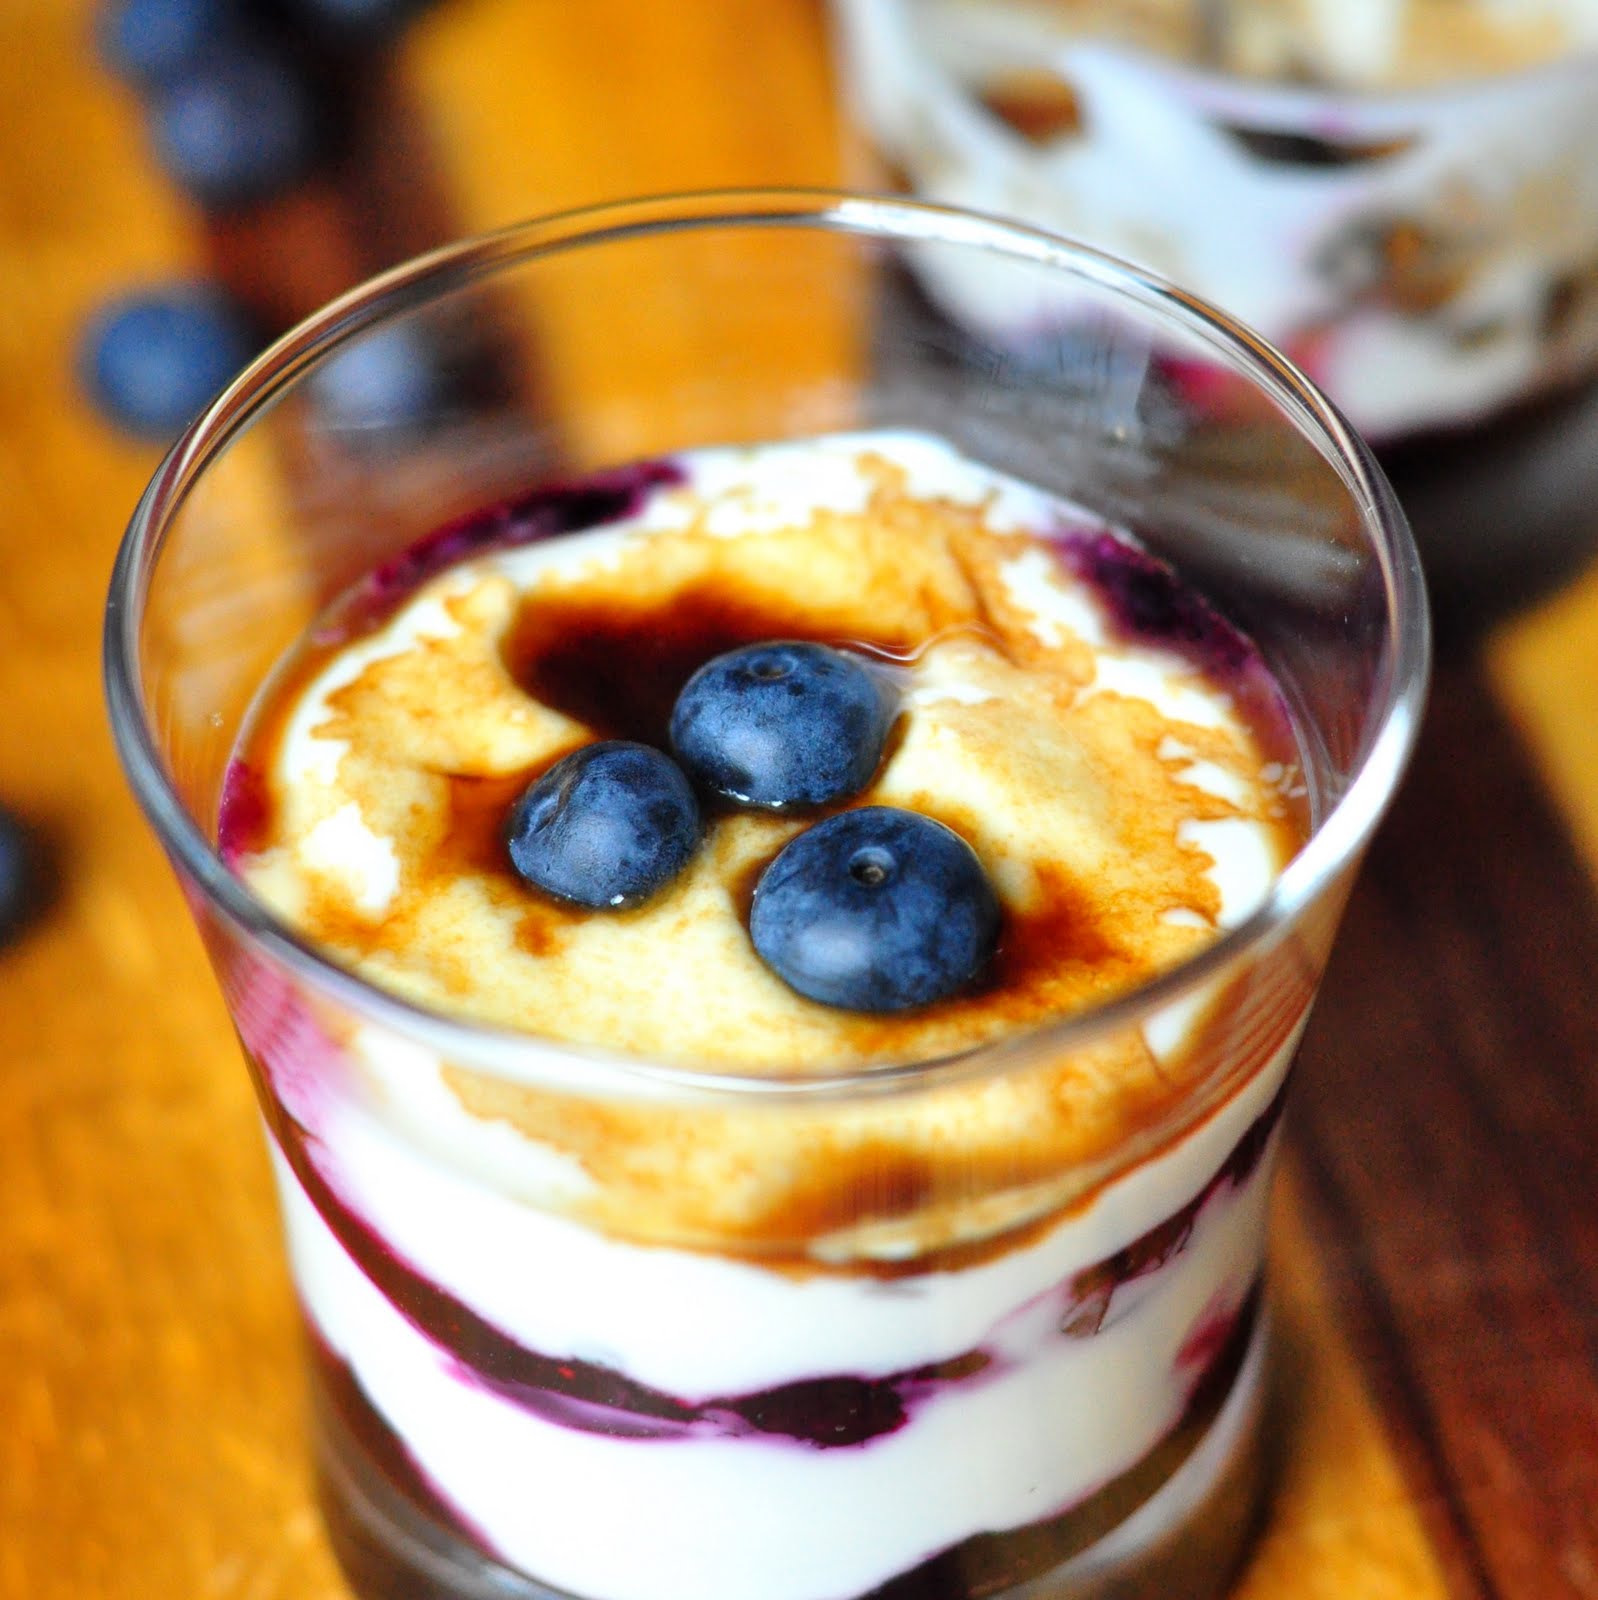
I was mulling over a healthy-ish dessert/supper option for tonight (not many, I can assure you) when I chanced upon this Blueberry Yogurt Brûlée in an old copy of Delicious Magazine.  Not only did it look delicious, it was also easy, and more importantly, guiltless. How great is that.   

I LOVE that it uses Greek yogurt, which is richer and creamier and therefore feels absolutely sinful in its luxuriating unctuousness while being absolutely not. A most lovely contradiction. Apparently, Greek yogurt is also healthier than regular yogurt, as it contains more protein and less carbs - all the more reason to make the switch.

The additional step of cooking the blueberries lightly in honey, really helps the flavours to meld together much better than merely folding in fresh berries (which is what I usually do for breakfast). Sprinkled atop the yogurt, the velvety muscovado sugar turns into a beautiful, dark, caramelly syrup, which I slurp up (and pretend is toffee sauce).  Good quality manuka honey, with its unique woody, caramel notes, also makes a real difference to this dessert (so don't use the cheap stuff).
 
Great as a simple dessert, and refreshing for breakfast.  At 112 calories per serving, guiltlessness really doesn't get much better than this.

Recipe for Blueberry Yogurt Brûlée
(by Joy Skipper, Delicious Magazine)

This is a healthier take on crème brûlee which, because of the high cream content, is extremely high in saturated fat. Using yogurt instead of cream makes for a lighter, yet still delicious end to the meal. Serves 4


Ingredients
200g blueberries
2 tsp manuka honey
250g Greek yogurt
4 tsp dark muscovado sugar

Method 

  1. Place the blueberries and manuka honey in a small saucepan and heat gently, until the juices of the blueberries start to run and the fruit softens slightly. Remove from the heat and spoon the fruit and juices into 4 individual serving bowls (about 125ml). Leave to cool.
  2. Spoon the yogurt over the blueberries and sprinkle each bowl with 1 tsp of the muscovado sugar. This will melt and turn syrupy. Place the bowls in the fridge to chill until ready to serve.
Nutritional Information:
Per serving: 112kcals, 3.8g fat (2.6g saturated), 3.6g protein, 9.5g carbs, 14.4g sugar, 0.2g salt

(This dessert was submitted for Sweets for a Saturday Party #25)

LinkWithin

Related Posts with Thumbnails